 |
Compare and Merge for Excel 365 (beta) Help |
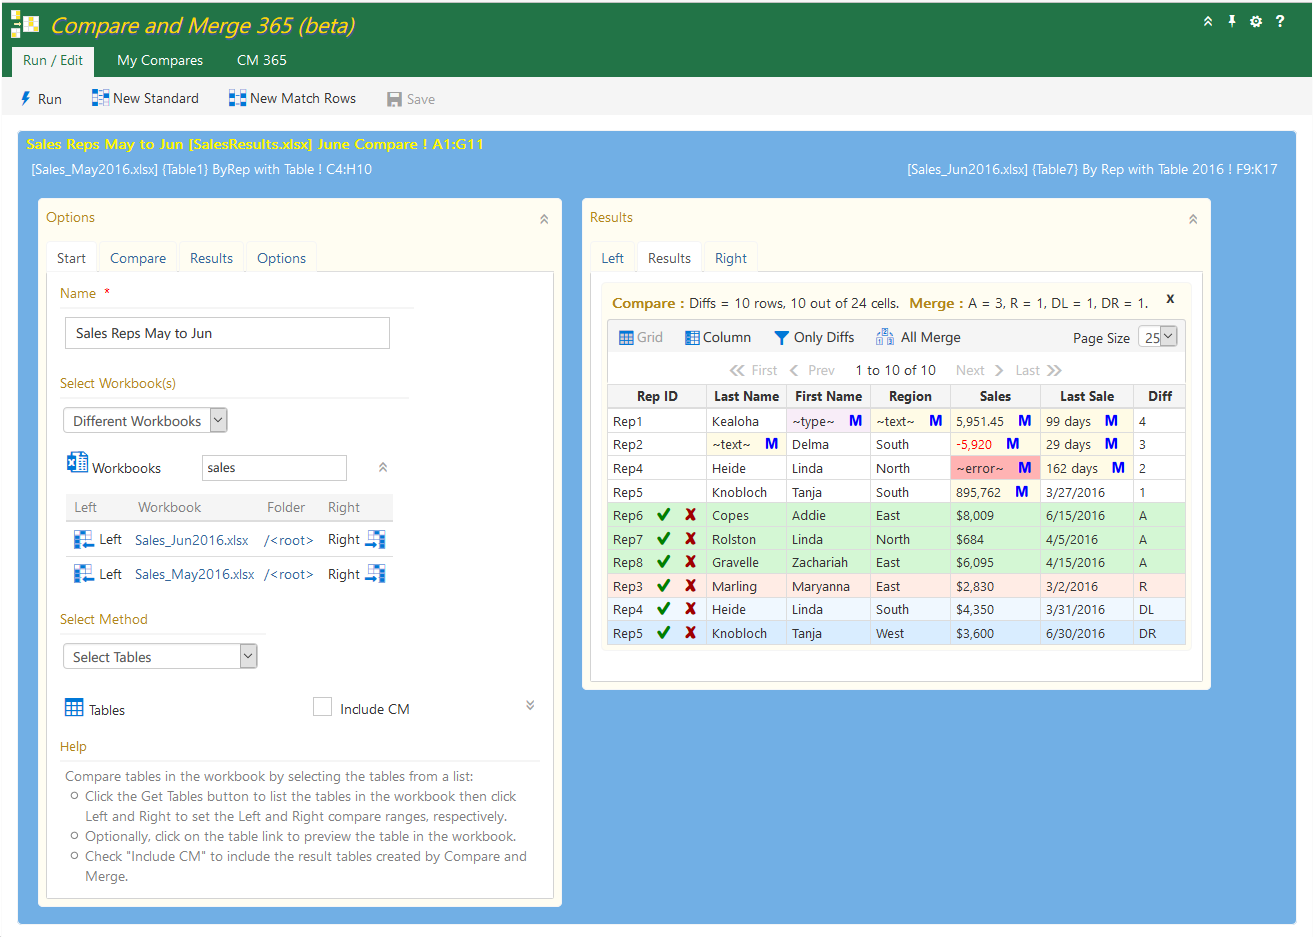
Compare and Merge for Excel 365 has most of the same features as Compare and Merge Add-In. The primary difference is the ability to compare ranges from different workbooks and also that a "results" workbook can be selected to display the sheet results of the comparison. The workbooks must be stored on your OneDrive for Business from your Office 365 account. In addition, to achieve the same formatting as in Compare and Merge Add-In you must use the Compare and Merge 365 (beta) Integration feature.
With Compare and Merge for Excel 365 you must select the workbook(s) containing the ranges to compare. First select whether you want to
compare ranges from the same workbook or from different workbooks.
 The Select Methods available vary depending on this selection. For example the Select Method "Same Sheet, Find Ranges" does not
make sense if you select Different Workbooks since this select method finds the compare ranges on a single worksheet.
The Select Methods available vary depending on this selection. For example the Select Method "Same Sheet, Find Ranges" does not
make sense if you select Different Workbooks since this select method finds the compare ranges on a single worksheet.
To list your OneDrive for Business workbooks click the  button. If you have many workbooks on OneDrive you will need to enter the name, or partial name, of the workbook to find. If you selected
"Same Workbook" then click the
button. If you have many workbooks on OneDrive you will need to enter the name, or partial name, of the workbook to find. If you selected
"Same Workbook" then click the  button to select
the single workbook containing the ranges to compare.. If you selected
"Different Workbooks" click the
button to select
the single workbook containing the ranges to compare.. If you selected
"Different Workbooks" click the 
 buttons to set the Left and Right compare
workbooks, respectively.
buttons to set the Left and Right compare
workbooks, respectively.
Follow a similar process for setting the workbook to add the compare results table. You have the option to use the Left or Right workbook or to select a separate workbook.


NOTE: As the beta progresses this help page will be updated.
Follow us on our social networks for app updates and productivy tips.


